


But there's one little concern that has been a headache for developers, which is moving a Wordpress site from localhost to a live domain. But this can easily be taken care of using the free backup and clone service from ManageWP.
ManageWp is a service that lets you backup and migrate wordpress websites with just a few clicks, without having you to go through any of those technical hassles which include database backups and renaming url in the database etc.
Inorder to backup and clone your “offline” site with ManageWP, we need to make it visible from the internet using port forwarding.
Step 1: Find you Local IP address


Step 2: Forward Your IP Address
Internet browsers typically try to access web servers via port 80. So when ManageWP tries to connect to a website, the attempt will typically be made via that port. As such, we need to tell the router to redirect requests via that port to your computer’s local IP address.
If you have a router then you can configure the port settings on it by pulling up the router page, but if you don't have one you will have to download UPnP PortMapper from here, you will now have a .jar file which will act as a router for our setup.

Right click on the downloaded .jar file, goto the properties, select the permissions tab and grant the execute permission to the file.

Then right click on the file and open it using the Openjdk java runtime.

And that should bring up the Portmapper program.

Click on create on the right side under Port mapping presets.
- Enter a description
- Add your local ip address under remote host
- Make sure use local host is checked

Then click on add button and change the Internal and External port values to 21 and make sure you save it.

Now in the Port mapping presets menu select the preset and click on Use.


Wait for a few seconds and you should have the port forwarding up and running.
Step 3: Change the wordpress site url.

Login to you localhost wordpress site and in the dashboard under Settings click on general settings and
Step 4: Add your website to ManageWp.


- change the WordPress Address (URL) and Site Address (URL) from localhost to your local ip address
- and make sure you click on save changes. And once the changes are saved you will be logged out of the dashboard.
Step 4: Add your website to ManageWp.

Firstly install the ManageWP worker plugin on your localhost wordpress site.

And activate the plugin

After activating the plugin you will see a warning message, but don't worry that will soon go away once we add the website to ManageWP dashboard.

Open a free account under ManageWP and login to the dashboard and click on add your first website.

Enter the url of your wordpress site and make sure you use ip address instead of localhost. Enter the username and click on add site.

If everything goes well you should see the above message.
Step 5: Generating localhost website backup file.


Now you will have to wait for a few minutes while changes are executed on your live domain website.


Hover your mouse over your website under the list and click on Backup Now under Advanced.

The default settings will suffice for a full backup/clone.

You will now have to wait for a while (depending on the size of your site and you Internet connection) till the backup is generated. And then download the backup file on to your system.
Step 6: Remove localhost website from ManageWP.
At this point we have a backup copy of the localhost website that we will be using to clone on our live domain.


Step 6: Remove localhost website from ManageWP.
At this point we have a backup copy of the localhost website that we will be using to clone on our live domain.

Inorder to avoid confusions we will remove the localhost website from ManageWP dashboard and disable the ManageWp worker plugin.

Check mark on Deactivate ManageWp Worker plugin and click ok.
Step 7: Add your wordpress site on live domain to ManageWP.
Now add your Wordpress site on the live domain to ManagWP in the same fashion as we added the localhost site.
First install the ManageWp worker plugin on the live domain site and activate it.
First install the ManageWp worker plugin on the live domain site and activate it.

Next add your live domain Wordpress website to ManageWP Dashboard.
And now we need to upload the backup copy of our localhost wordpress site that we had downloaded earlier from ManageWP to a host.
For doing that you can either use dropbox or since you now have the port forwarding on your system you can simply copy the backup file to var/www folder on your system and use your system as a host.
I am going to use the second option that is copying the backup file to var/www folder, but you can select whatever's best for you.
Now you have the backup file under var/www so the url to the file would be your ip address followed by the path to your wordpress backup file.
http://x.x.x.x/solancer_backup_copy.zip
This is a very important step so pay attention to details in the screenshots.

Now on the ManageWP dashboard click on install or clone wordpress under the Tools option.
- Without selecting anything in the list enter the url of the backup file under Backup URL and click on Accept.
- Note: All of the files and settings on your live domain wordpress install will be replaced by the backup file contents which include your username, uploaded files, database stuff etc.

Select destination as Existing Site
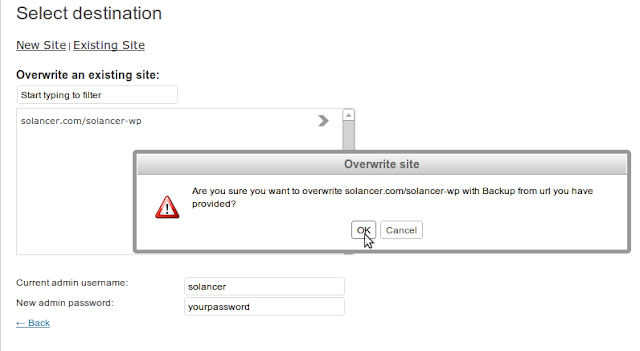

And then in the next window
- Under Current admin username type your live domain Wordpress username.
- In the New admin password type a new password.
- And select your site from the list.
- Click ok for overwriting the site.
Now you will have to wait for a few minutes while changes are executed on your live domain website.

You can now login into your live domain using the
- username(localhost site username)
- and password(new password you entered).
Once the cloning is successful you could disable and remove the ManageWp worker plugin and remove your site from ManageWp or you can use it to maintain you site.


4 comments:
This is not working. First in your example you are using Remote hosting IP an then you are forwarding port 21 instead of port 80
Cool article. I love wordpress, the API hook/plugin system makes me feel like I can do anything.
Wordpress Websites
For doing that you can either use dropbox or since you now have the port forwarding on your system you can simply copy the backup file to var/www folder on your system and use your system as a host.
additional hints
look at this web-site
their explanation
internet
find more
Read More Here
here
Visit Website
hop over to this website
click
Once the cloning is successful you could disable and remove the ManageWp worker plugin and remove your site from ManageWp or you can use it to maintain you site.
arzhost
Post a Comment